Database Access with SQL Server on Azure
Teleport can provide secure access to Azure SQL Server via the Teleport Database Service. This allows for fine-grained access control through Teleport's RBAC.
In this guide, you will:
- Configure your Azure SQL Server database with Microsoft Entra ID-based authentication.
- Add the database to your Teleport cluster.
- Connect to the database via Teleport.
How it works
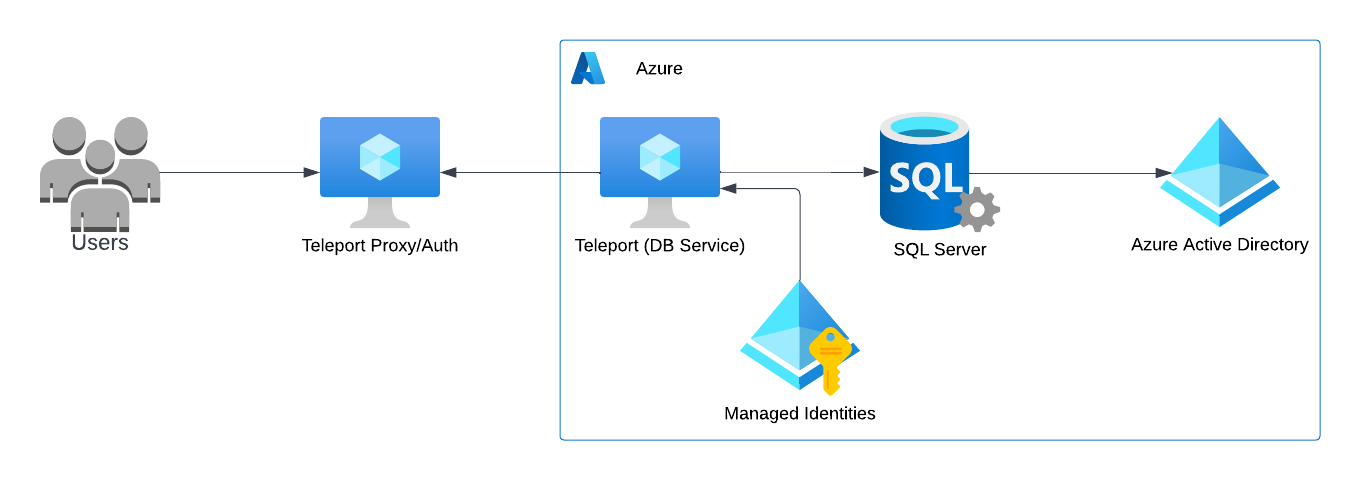
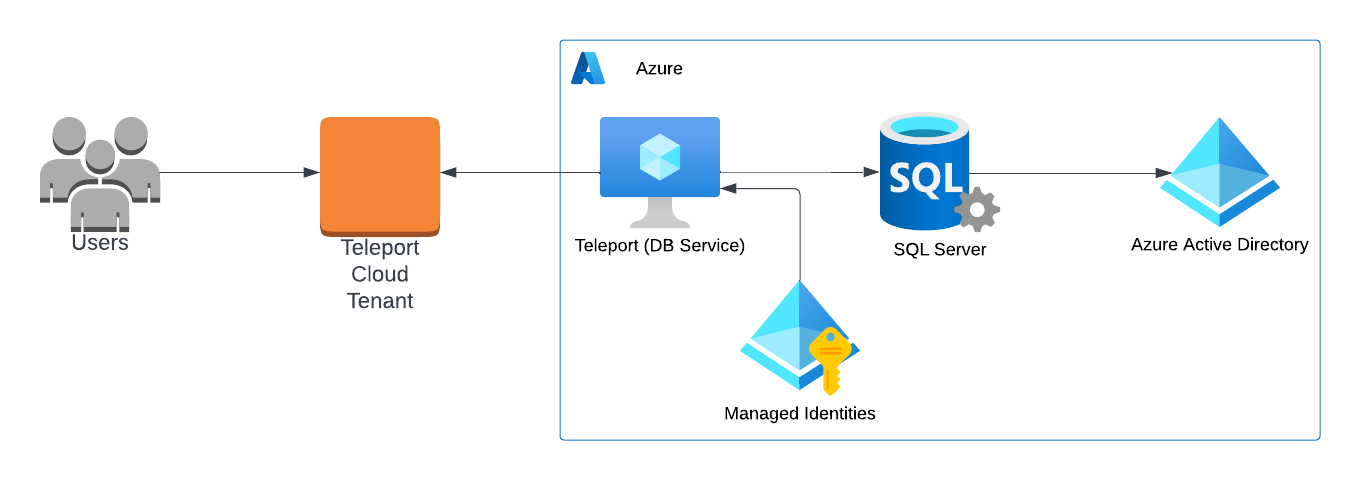
The Teleport Database Service runs on an Azure virtual machine with an attached Azure identity with permissions to retrieve authentication tokens from Azure Active Directory. When a user connects to SQL Server with Teleport, the Teleport Database service authenticates with Azure AD, then uses an authentication token to connect to SQL Server. The Database Service then forwards user traffic to the database.
- Self-Hosted
- Teleport Enterprise Cloud
Prerequisites
Database access for Azure SQL Server with Azure Active Directory authentication
is available starting from Teleport 11.0.
-
A running Teleport cluster version 15.4.22 or above. If you want to get started with Teleport, sign up for a free trial or set up a demo environment.
-
The
tctladmin tool andtshclient tool.On Teleport Enterprise, you must use the Enterprise version of
tctl, which you can download from your Teleport account workspace. Otherwise, visit Installation for instructions on downloadingtctlandtshfor Teleport Community Edition.
- SQL Server running on Azure.
- The Teleport Database Service running on an Azure virtual instance.
- To check that you can connect to your Teleport cluster, sign in with
tsh login, then verify that you can runtctlcommands using your current credentials.tctlis supported on macOS and Linux machines. For example:If you can connect to the cluster and run the$ tsh login --proxy=teleport.example.com --user=email@example.com
$ tctl status
# Cluster teleport.example.com
# Version 15.4.22
# CA pin sha256:abdc1245efgh5678abdc1245efgh5678abdc1245efgh5678abdc1245efgh5678tctl statuscommand, you can use your current credentials to run subsequenttctlcommands from your workstation. If you host your own Teleport cluster, you can also runtctlcommands on the computer that hosts the Teleport Auth Service for full permissions.
Step 1/8. Create a Teleport user
To modify an existing user to provide access to the Database Service, see Database Access Controls
- Teleport Community Edition
- Teleport Enterprise/Enterprise Cloud
Create a local Teleport user with the built-in access role:
$ tctl users add \
  --roles=access \
  --db-users="*" \
  --db-names="*" \
  alice
Create a local Teleport user with the built-in access and requester roles:
$ tctl users add \
  --roles=access,requester \
  --db-users="*" \
  --db-names="*" \
  alice
| Flag | Description |
|---|---|
--roles | List of roles to assign to the user. The builtin access role allows them to connect to any database server registered with Teleport. |
--db-users | List of database usernames the user will be allowed to use when connecting to the databases. A wildcard allows any user. |
--db-names | List of logical databases (aka schemas) the user will be allowed to connect to within a database server. A wildcard allows any database. |
Database names are only enforced for PostgreSQL, MongoDB, and Cloud Spanner databases.
For more detailed information about database access controls and how to restrict access see RBAC documentation.
Step 2/8. Enable the SQL Server Azure Active Directory integration
If you have it enabled, you can go to the next step.
Go to the Azure Portal, select Database servers, and select the database you wish to enable the Azure Active Directory integration.
Select Azure Active Directory in the left-hand column.
Select Set Admin, and choose an account that will be added as an admin login to SQL Server.

Step 3/8. Configure IAM permissions for Teleport
The Teleport Database Service needs Azure IAM permissions to:
- Discover and register SQL Server instances.
- Fetch virtual machine managed identities used for login.
Configure an Azure service principal
Teleport requires the following permissions:
<resource-type>/readpermissions for discovery, but only for the resource types you have. For example,Microsoft.Sql/managedInstances/read.Microsoft.Compute/virtualMachines/read.
Here is a sample role definition allowing Teleport to read Azure SQL Servers and Azure SQL Managed Instances:
{
    "properties": {
        "roleName": "SQLServerAutoDiscovery",
        "description": "Allows Teleport to discover SQL Servers and SQL Managed Instances.",
        "assignableScopes": [
            "/subscriptions/xxxxxxxx-xxxx-xxxx-xxxx-xxxxxxxxxxxx"
        ],
        "permissions": [
            {
                "actions": [
                    "Microsoft.Sql/managedInstances/read",
                    "Microsoft.Sql/servers/read",
                    "Microsoft.Compute/virtualMachines/read"
                ],
                "notActions": [],
                "dataActions": [],
                "notDataActions": []
            }
        ]
    }
}
The assignableScopes field above includes a subscription
(/subscriptions/<subscription>), allowing the role to be assigned at any
resource scope within that subscription or the subscription scope itself.
If you want to further limit the assignableScopes, you can use a resource
group (/subscriptions/<subscription>/resourceGroups/<group>) or a management
group (/providers/Microsoft.Management/managementGroups/<group>) instead.
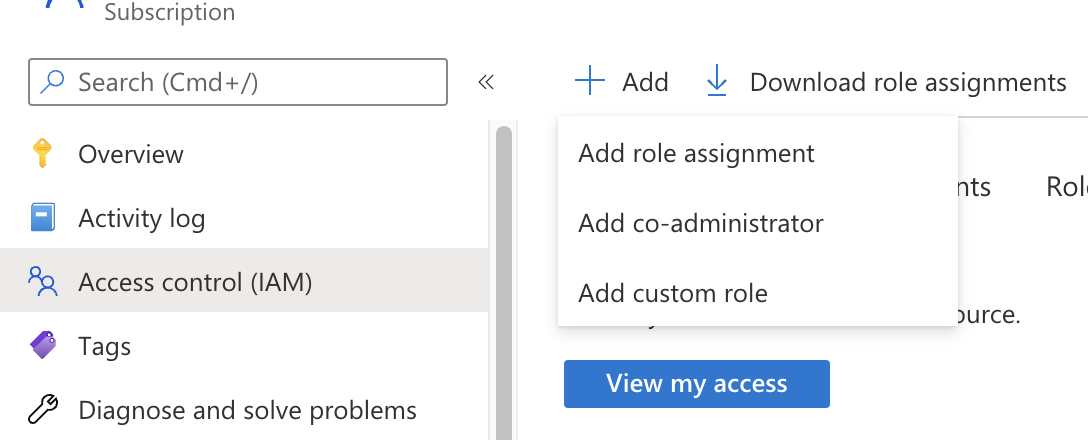
Go to the Subscriptions page and select a subscription.
Click on Access control (IAM) in the subscription and select Add > Add custom role:
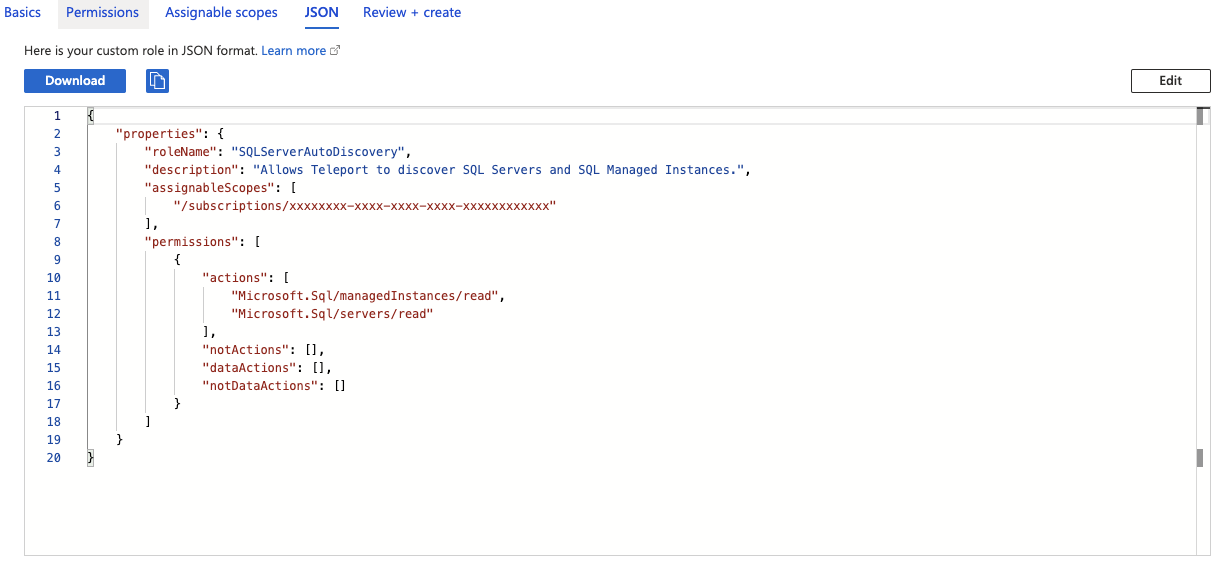
In the custom role creation page, click the JSON tab and click Edit,
then paste the JSON example and replace the subscription in assignableScopes
with your own subscription id:
Step 4/8. Configure virtual machine identities
In the Teleport Database Service virtual machine's Identity section, enable the system assigned identity. This is used by Teleport to access Azure APIs.
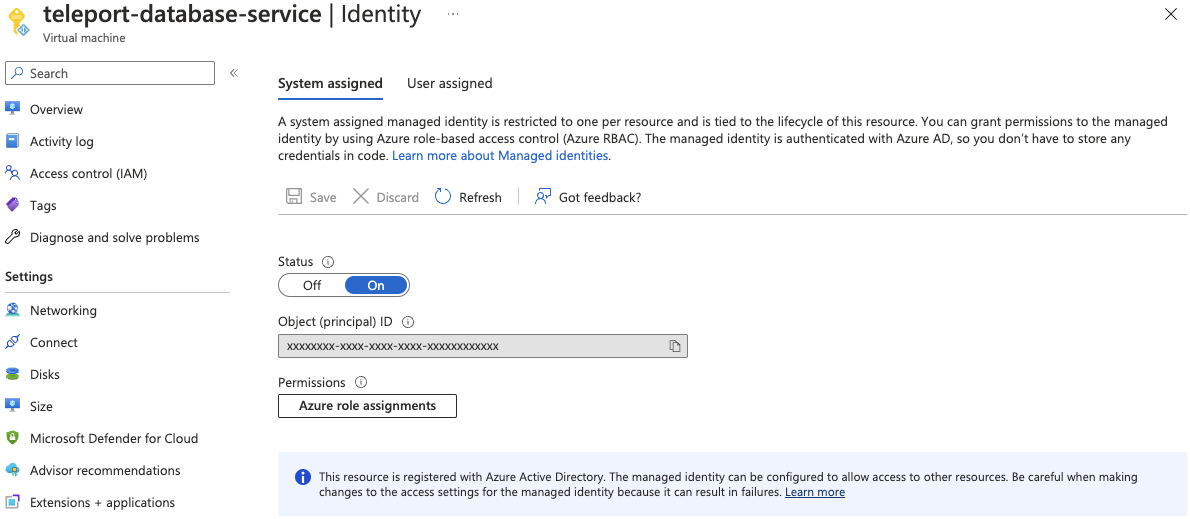
To grant Teleport permissions, the custom role you created must be assigned to the virtual machine system assigned identity. On the same page, click on the Azure role assignments, then on Add role assignment. Select the custom role and save.
The role assignment should be at a high enough scope to allow the Teleport Database Service to discover all matching databases. See Identify the needed scope for more information about Azure scopes and creating role assignments.
Login identities
The Teleport Database Service needs access tokens from Azure AD to authenticate with SQL Server databases.
It uses the managed identities attached to its Virtual Machine to fetch the authentication token.
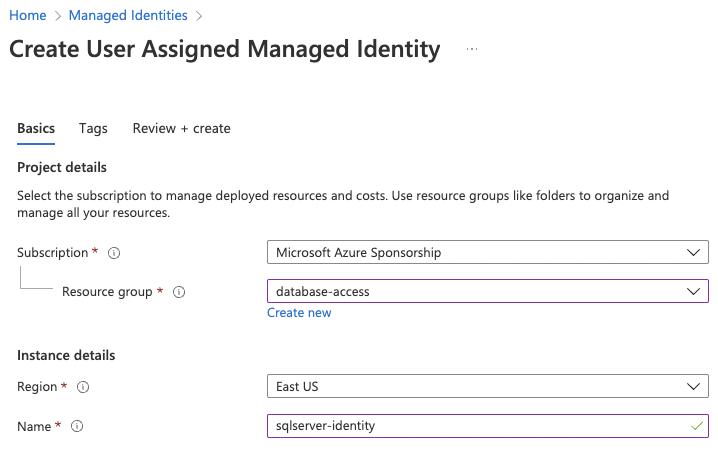
To create a new user-assigned managed identity, go to the Managed Identities page in your Azure Portal and click on Create. Choose a name and resource group for it and create:
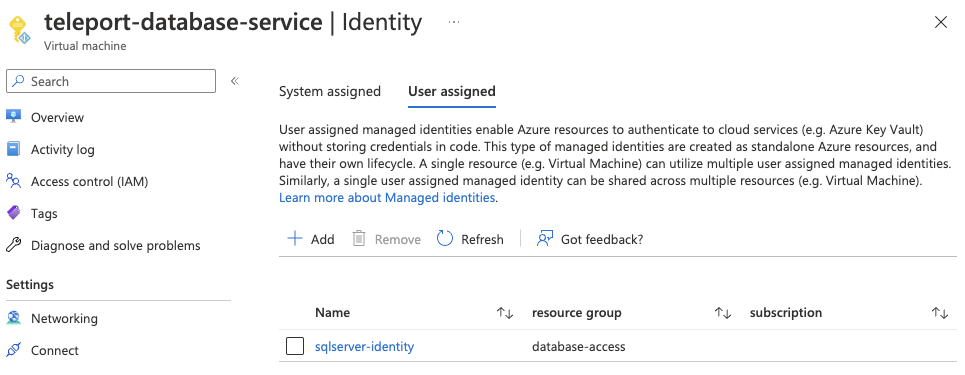
Next, go to the Teleport Database Service virtual machine instance, Identity section, select User assigned, and add the identity we just created:
Step 5/8. Enable managed identities login on SQL Server
Azure AD SQL Server integration uses database-level authentication (contained users), meaning we must create a user for our identities on each database we want to access.
To create contained users for the identities, connect to your SQL server using its Activity Directory Admin and execute the query:
USE MyDatabase;
CREATE USER [sqlserver-identity] FROM EXTERNAL PROVIDER;
The newly created user will be attached to the public role, which might not
have enough permissions to perform queries. Consider granting individual
permissions to the user or assigning it to an existing role. For example, add
the user as a member of the db_datareader role:
ALTER ROLE db_datareader ADD MEMBER [sqlserver-identity];
Step 6/8. Create a Database Service configuration
Install Teleport on the host where you will run the Teleport Database Service:
Install Teleport on your Linux server:
-
Assign edition to one of the following, depending on your Teleport edition:
Edition Value Teleport Enterprise Cloud cloudTeleport Enterprise (Self-Hosted) enterpriseTeleport Community Edition oss -
Get the version of Teleport to install. If you have automatic agent updates enabled in your cluster, query the latest Teleport version that is compatible with the updater:
$ TELEPORT_DOMAIN=example.teleport.com
$ TELEPORT_VERSION="$(curl https://$TELEPORT_DOMAIN/v1/webapi/automaticupgrades/channel/default/version | sed 's/v//')"
Otherwise, get the version of your Teleport cluster:
$ TELEPORT_DOMAIN=example.teleport.com
$ TELEPORT_VERSION="$(curl https://$TELEPORT_DOMAIN/v1/webapi/ping | jq -r '.server_version')" -
Install Teleport on your Linux server:
$ curl https://cdn.teleport.dev/install-v15.4.22.sh | bash -s ${TELEPORT_VERSION} editionThe installation script detects the package manager on your Linux server and uses it to install Teleport binaries. To customize your installation, learn about the Teleport package repositories in the installation guide.
Generate a configuration file at /etc/teleport.yaml for the Database Service.
Set the --proxy command-line option to the address for your Teleport cluster
and the --azure-sqlserver-discovery to the appropriate region:
$ sudo teleport db configure create \
   -o file \
   --token=/tmp/token \
   --proxy=teleport.example.com:443 \
   --azure-sqlserver-discovery=eastus
The command will generate a Database Service configuration with Azure SQL
Server auto-discovery enabled in the eastus region and place it at the
/etc/teleport.yaml location.
Step 7/8. Start Teleport Database Service
Configure the Teleport Database Service to start automatically when the host boots up by creating a systemd service for it. The instructions depend on how you installed the Teleport Database Service.
- Package Manager
- TAR Archive
On the host where you will run the Teleport Database Service, enable and start Teleport:
$ sudo systemctl enable teleport
$ sudo systemctl start teleport
On the host where you will run the Teleport Database Service, create a systemd service configuration for Teleport, enable the Teleport service, and start Teleport:
$ sudo teleport install systemd -o /etc/systemd/system/teleport.service
$ sudo systemctl enable teleport
$ sudo systemctl start teleport
You can check the status of the Teleport Database Service with systemctl status teleport
and view its logs with journalctl -fu teleport.
A single Teleport process can run multiple different services, for example multiple Database Service agents as well as the SSH Service or Application Service.
Step 8/8. Connect
Log in to your Teleport cluster. Your database should appear in the list of available databases:
$ tsh login --proxy=teleport.example.com --user=alice
$ tsh db ls
Name                Description                       Allowed Users Labels Connect
------------------ ---------------------------------- ------------- ------ -------
sqlserver          Azure SQL Server in westeurope     [*]           ...
sqlserver-managed  Azure Managed SQL Server in eastus [*]           ...
To retrieve credentials for a database and connect to it:
$ tsh db connect --db-user=sqlserver-identity --db-name=master sqlserver
Where --db-user is the managed identity name.
Either the sqlcmd or mssql-cli command-line clients should be available in
PATH in order to be able to connect. tsh attempts to run sqlcmd first and,
if it's not present on the PATH, runs mssql-cli.
If you have neither command-line clients available on your system, you can run the following command to start a local proxy server that you can connect to with your SQL Server client:
$ tsh proxy db --db-user=teleport --tunnel sqlserver
Read the Database Access GUI Clients guide for how to connect your DB GUI client to the local proxy.
Troubleshooting
Could not find identity
If you see the error could not find identity "my-identity" attached to the instance when connecting to your database, then the identity you’re trying to
connect with is not attached to the Teleport Database Service virtual machine.
You can navigate to the Virtual Machines page within Azure Portal,
open the Teleport instance, Identity section, and choose User
assigned to see all identities you can connect with. If you don’t see your
identity check Step 4 to see how
to add it.
Login failed for the user
When connecting to your database, and you see the error mssql: login error: Login failed for user '<token-identified principal>', it means your managed identity
login is not present on the SQL database. You’ll need to create their users as
described in Step 6.
Remember: you must create the users on all databases you want to connect.
Timeout connecting to the database
If you receive the error i/o timeout issue when connecting to your database,
please check if the Teleport Database service can reach the database on
Azure.
In case your database is public, you can enable it to receive connections from Azure services without creating firewall rules: Go to your database page, Network tab, and at the bottom of the page in the Exceptions section check the option "Allow Azure services and resources to access this server" and save.
If your database is not public and it is using private endpoints, ensure that they're on the same VPC, or if the Teleport VM VPC is peering with the database one.
To check if the VM has access, you can do the following on the VM:
- Using
netcat:nc -v yourdatabase.database.windows.net 1433 - Using
telnet:telnet yourdatabase.database.windows.net 1433
Next steps
- Learn how to restrict access to certain users and databases.
- View the High Availability (HA) guide.
- Take a look at the YAML configuration reference.
- See the full CLI reference.